One of the exciting new features in Photoshop CS5 is the more natural way of painting, opening new ways to express your creativity – even if (like me) you’re not a true painter. In this tutorial I will show you the techniques and the tricks to convert a photo into a great-looking painting.
I must start by stating that if you’re really serious about digital painting, you should consider Corel Painter 11, which is a dedicated natural-media painting program that allows you to use anything from a HB pencil to chalk, charcoal and watercolors and also simulates the canvas properties in addition to the brushes. Nevertheless, Photoshop’s new offering is a solid one and more than enough for many artists.
For best results, a Wacom tablet like the new Intuos 4 is also recommended, although not required. In addition to pressure sensitivity, the new Wacom also senses the angle of the stylus, allowing for even more realistic results.
Theory
There are two new features used for painting in Photoshop CS5. The first one is the new Brush Tip options.
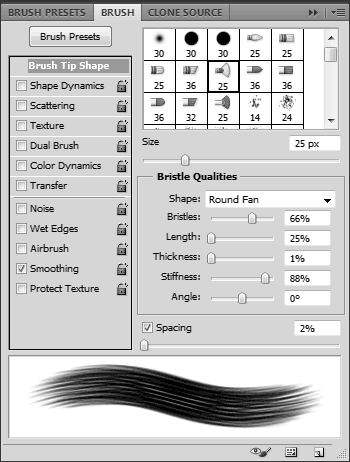
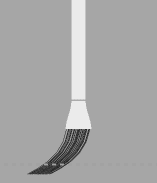
With the new brushes, you can control the number of bristles, length, thickness and stiffness and not only can you see the result in the brush panel, you also get an overlay window that shows you the 3D virtual brush and its bristles.
I am not really a big fan of the brush preview window but thankfully you can turn it off if you find it distracting.
The second ingredient in the digital paint toolbox is the Mixer Brush. The Mixer Brush is like a combination of the normal brush and the smudge tool. As you paint, it smudges and mixes the color, as if you were using wet paints.

The way the brush color is mixed with the canvas is controlled by three parameters – the wetness of the paint, the load of the brush and the mix amount between the paint color and the canvas color.

To illustrate these parameters, I brushed quickly over an image with different settings:
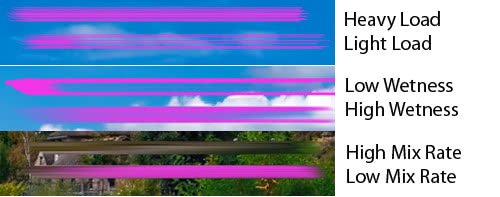
So, a heavy load will carry more paint over a stroke than a light load; wetness smudges and mixes the canvas color with the paint color; a high mix rate will use more of the canvas color than the paint color.
Practice
The real magic with the Mixing Brush is that you can paint using the colors from a picture, effectively helping to you turn a photo into a painting with little effort.
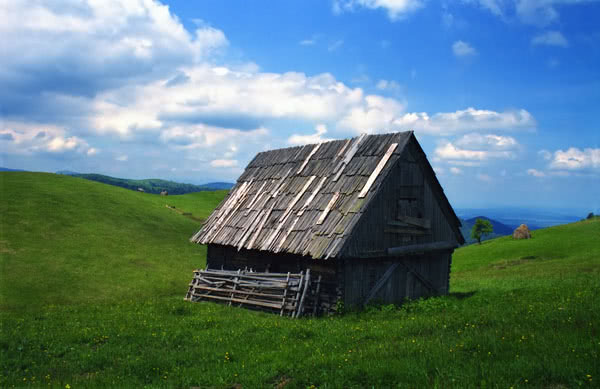
To demonstrate this, I will start with a nice photo I took 10 years ago on film.
Create a new transparent layer. Select the Mixing Bush and from the top bar choose the preset Very Wet, Heavy Mix; choose the brush that you want from the Brushes panel and make it a big size.
To paint on the new layer using the colors from the background, with the Mixing Brush tool selected, make sure that the option Sample All Layers at the top is selected. Deselect the icon (Load the brush after each stroke) then Alt-click on the image to load the brush and start painting on the new layer.
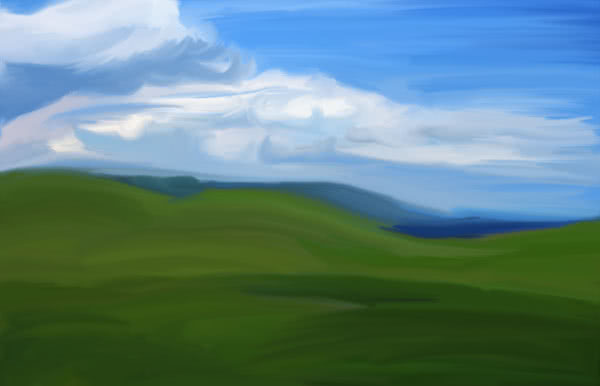
To paint effectively, you need to think in terms of layers, from background to foreground and from broad to detail. Therefore we’ll start painting the background, using broad strokes with a large brush tip, ignoring the shack/cabin completely. Your strokes should more or less follow the contours of the terrain and clouds.
Hide the background layer temporarily to see the effect so far:
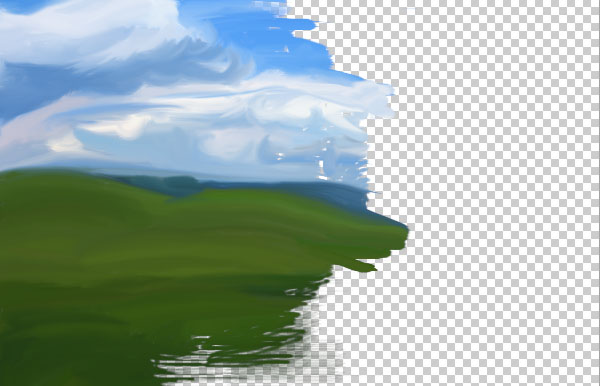
As you can see, I smudged the colors over the shack as if it did not exist. Also, notice how my strokes follow the hills and the shapes of the clouds. Keep working until you fill the layer and are happy with the result.
Next, we need to paint the cabin. It’s better to paint it on its own layer so that if you decide to change anything, it doesn’t mess with the background.
To do that, you need to hide the landscape layer, create a new one and paint on it. This time you’ll ignore the landscape and do just the cabin. You also need to make the brush tip smaller. Make sure the background photo is visible so it can pick the colors from it.
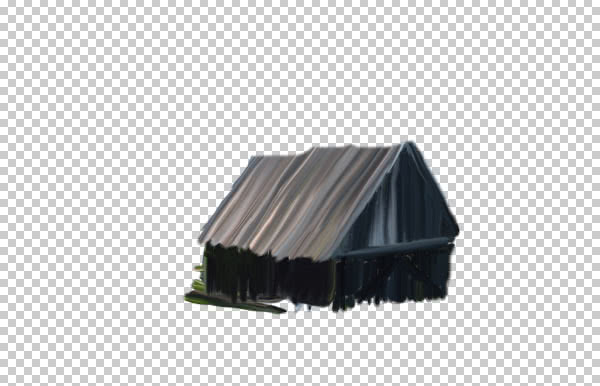
If you look at the roof, you’ll see that I erased from it some parts I did not like – this is why it’s a good practice to work on separate layer.
Now that we have the broad strokes, it’s time to bring in the details. Repeat the process – hide the shack layer, make sure the background photo is visible, make the brush tip even smaller, create a new layer and start painting on it. This time you no longer need to fill all the stuff, just short, fine strokes in the areas you want detail.
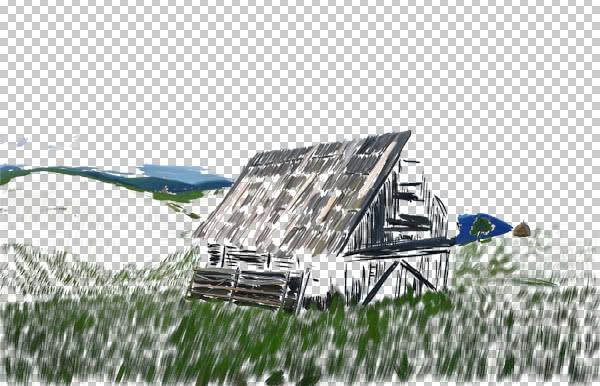
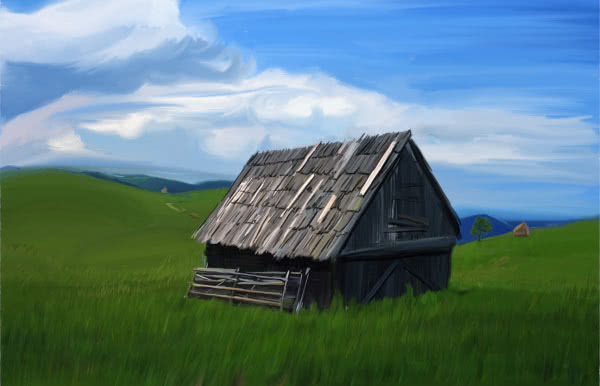
If you show all layers, this is what we get:
Not bad. We still want to add some more details like shadows. Create a new layer and set its mode to Multiply and opacity to around 60%. Choose a Dry Mixing Brush – now we don’t need to mix with the background – and black for color. Paint the shaded areas.
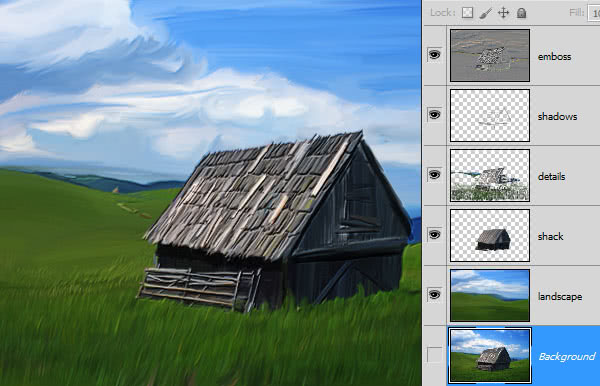
At this point you can leave it as it is, or you can add a final touch. One of the nice things about oil paint is that it has thinkness. To give this kind of tridimensional effect, you need to create a merged copy of the layers. The easy way is to duplicate all layers and then merge the copy (quickest route: select the layers and press Shift+CTRL+ALT+E or Shift+CMD+OPT+E on Mac). Now you should have a new merged layer in addition to the original ones.
An even better method would be to select the layers, choose Layer –> Smart Objects –> Convert to Smart Object and then duplicate this smart object via Layer –> Duplicate Layer or CTRL+J (CMD+J on Mac). This method is better because it leaves the contents of the smart object editable as well as the Emboss effect.
Whichever method you chose, with this new layer selected, choose Filters –> Stylize –> Emboss and in the dialog enter some values like below:
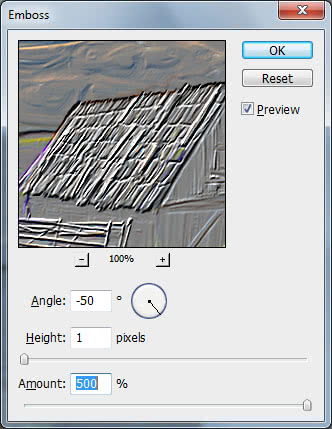
Make sure Height is relatively small – this depends on how large your canvas is, and make sure you crank the Amount all the way to the max. You can always tone the effect down later with opacity. With this emboss layer, set the mode to Overlay.
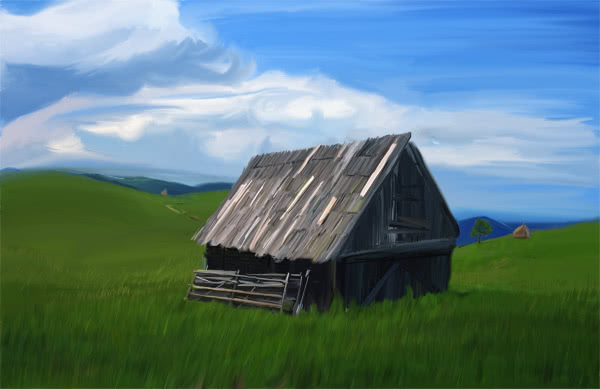
Here’s the end result, including all the layers for reference:
And there you have it!


10 Responses
Wow since you don’t need any coloring knowledge it feels like cheating! You must have selected “Load the brush after each stroke” again to do the background without it sampling the shed right?
Well done! Nice technique on building up detail incrementally on fresh layers… Thanks 🙂
Very Good Tutorials, I also added your Tutorial on facebook
Nice tutorial. Nice effect and nice photography. I will surely try this when I install cs5.
Fabulous tutorial! Your details on the shed in particular were really nice. I was a little wary of using the painting tools, but this was a great tutorial to get me acquainted with them. Thanks a lot!
Uhhhhhggg so there is no way to stop it from sampling the layer your painting on? I only want it to sample the picture, I don’t want it resampling the layer I’m painting on. this is such a basic feature in other painting applications, I’m just getting into using it, and I can’t believe I have to sample all layer or nothing.
You should be able to do the painting you did in one layer, also if you make a mistake and paint a color where it shouldn’t be, there is literally no way to resample the background again because you painted all over that spot and it’s just going to resample the mistake!
uhhhggggg! I can’t believe it…
nice tutorials if u want to learn Free adobe photoshop thein visit this website http://basictrainingofphotoshop.blogspot.com
Vey nice and helpful, thanks!
I only want it to sample the picture, I don’t want it resampling the layer I’m painting on. this is such a basic feature in other painting applications, I’m just getting into using it, and I can’t believe I have to sample all layer or nothing.
You should be able to do the painting you did in one layer, also if you make a mistake and paint a color where it shouldn’t be, there is literally no way to resample the background again because you painted all over that spot and it’s just going to resample the mistake!
Dude, are you making your own brushes or downloading them? You’ve got mad skills.
Comments are closed.