There are several approaches to generating chess diagrams and my initial impulse was to create them client-side with Javascript. This has the advantage of conserving server resources (CPU, bandwidth, disk space) but also downsides as it’s less SEO-friendly and less user-friendly; readers may want to download the diagrams.
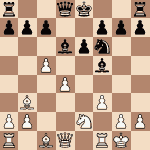
In this post, I’ll show you how to generate chess diagrams on the server using PHP. The diagrams are cached automatically and served directly next time they’re requested. The diagram will look like this:
Parsing the board representation
Fortunately, we have a standard for representing the board in a compact fashion: The Forsyth–Edwards Notation. Over a hundred years old, this notation allows us to quickly represent the board. Now, this is a PHP-related post, not a chess-related one, so I won’t get into details, but for the sake of understanding what’s going on, a FEN string looks like this:
rnbqkbnr/pp1ppppp/8/2p5/4P3/8/PPPP1PPP/RNBQKBNR w KQkq c6 0 2
Lowercase characters are black, uppercase are white. K=King, Q=Queen and so on, with P standing for Pawn. The stuff after the first space is about the board state and does not concern us in this case.
The board is read from the top left corner, to the right and downwards. A forward slash acts as new line. Numbers are for empty spaces. So “8/2p5” can be read as “8 empty spaces, then on the next row (rank) 2 empty spaces, a pawn, then 5 more empty spaces.
So to parse a FEN into a a64-square array, we’d write:
function parse_fen($fen)
{
    // keep only the piece info from the FEN and turn into array
    $chars = str_split(explode(' ', $fen)[0]);
    $board = array_fill(0, 64, ' ');
    $row = 0;
    $col = 0;

    foreach($chars as $chr)
    {
        if ($row > 7)
            break;
        else
        if ($chr == '/' || $col > 7)
        {
            $row++;
            $col = 0;
        }
        elseif (strpos('12345678', $chr) !== false)
            $col += intval($chr);
        elseif (strpos('kqrnbpKQRNBP', $chr) !== false)
        {
            $board[$row*8+$col] = $chr;
            $col++;
        }
    }
    return $board;
}
Whether or not a more careful validation is required is debatable. Generally this should suffice, but note this function does not verify that the board position is valid. You could easily generate a board with 4 kings if you want.
Drawing the board
To draw the board, we’ll use the GD library. We need to
- create the canvas
- draw the squares
- add the piece images to the correct positions
- output the resulting image
Creating an empty image of a given size is easy. This function will create an empty canvas and return it, or false on error.
function create_image($size)
{
    if (!function_exists('imagecreatetruecolor'))
        return false;

    return imagecreatetruecolor($size, $size);
}
To draw the colored squares, we’ll need to specify colors as RGB values, but on the other hand it’s more convenient for us to use hex strings. So first we need to convert the colors from hex to RGB values:
function hex_rgb($clr)
{
    return array_map(
        function($c)
        {
            return hexdec(str_pad($c, 2, $c));
        },
        str_split(ltrim($clr, '#'),
        strlen($clr) > 4 ? 2 : 1));
}
The function above should work with shex strings with and without the pound sign (‘#’) at the beginning and also with short strings (e.g. ‘#abc’) as well as long ones (‘#aabbcc’). It will return an array with the 3 R, G, and B components.
The next function receives the image canvas created previously and will draw the 64 squares on it.
function draw_board($img)
{
    $size = imagesx($img)/8;
    for ($row=0; $row<8; $row++)
    {
        for ($col=0; $col<8; $col++)
        {
            $hex   = (($row + $col) % 2 === 1) ? '#b5876b' : '#f0dec7';
            $rgb   = hex_rgb($hex);
            $color = imagecolorallocate($img, $rgb[0], $rgb[1], $rgb[2]);

            $x1 = $col * $size;
            $y1 = $row * $size;
            $x2 = $x1 + $size - 1;
            $y2 = $y1 + $size - 1;

            imagefilledrectangle($img, $x1, $y1, $x2, $y2, $color);
        }
    }
}
As you can see, the code is straightforward. The function assumes the image canvas is square and will start drawing alternating dark and light squares 1/8 of the size of the image.
Adding the sprites
There are many sets of chess figurines, but by far the most legible one is Merida. It’s very old and free. Each figure is a PNG file with a naming convention: ‘w’ for white / ‘b’ for black, followed by the piece character as discussed in the FEN. So a white king would be in a ‘wk.png’ file and a black knight would be in a ‘bn.png’ file. I prefer not to use ‘n.png’ and ‘N.png’ because of case-insensitive file systems that might mess up the file names.
To optimize the process, we won’t load a PNG each time we encounter a piece on the table. This would mean that frequent pieces, such as pawns, are loaded repeatedly, up to 8 times. Instead, we’ll determine what pieces are on the board, load the image files once and then use them when needed.
So, we run array_unique() on the 64-square board to get the unique pieces. Then we go through each one, (‘K’, ‘p’, ‘n’…), determine the corresponding PNG (‘wk.png’, ‘bp.png’, ‘bn.png’), load it with imagecreatefrompng() and place the loaded resource as an array element where the key is the piece type (‘K’, ‘p’…).
Here’s the code:
function is_upper($str)
{
    return $str === strtoupper($str);
}

function get_sprite_name($p)
{
    $name = (is_upper($p) ? 'w' : 'b') . strtolower($p);
    return SPRITE_PATH . "$name.png";
}

function load_sprites($board)
{
    $sprites = [];
    $chars   = array_unique($board);
    foreach($chars as $chr)
    {
        if (strpos(PIECES, $chr) !== false)
        {
            $file = get_sprite_name($chr);
            $sprites[$chr] = imagecreatefrompng($file);
        }
    }
    return $sprites;
}
Now it’s time to place the images on the board. The next function receives references to the canvas, the 64-square array, the sprite array and the reversed parameter, which when true will draw a flipped board (with back at the bottom of the diagram). Note that the board looks the same when flipped so we don’t need to concern ourselves with it.
function add_pieces($img, $board, $reversed, $sprites)
{
    $sq_size = imagesx($img)/8;

    for ($i=0; $i<64; $i++)
    {
        $p = $board[$i];
        if ($p == ' ')
            continue;

        $col   = $i % 8;
        $row   = ($i - $col) / 8;

        if ($reversed)
        {
            $col = 7 - $col;
            $row = 7 - $row;
        }

        $x     = $col * $sq_size;
        $y     = $row * $sq_size;
        $piece = $sprites[$p];

        if (!empty($piece))
        {
            $p_size = imagesx($piece);
            imagecopyresampled($img, $piece, $x, $y, 0, 0, $sq_size, $sq_size, $p_size, $p_size);
        }
    }
}
As you can see, we go through the 64-square array. When we encounter a piece, we calculate its size and position on the board and get the loaded corresponding sprite from the sprite array and copy it on the canvas with imagecopyresampled().
Output and cleanup
To output the PNG, we’ll try to write it to disk and then show it to the user. This way the next time the same diagram is requested, we can simply return the saved image,
For this, we first need to make up a name for each diagram. This is composed from the actual FEN, size and whether or not it’s reversed.
So the steps would be: replace the slashes in FEN with some other character, join FEN with size and reverse, then strip any unexpected character (just in case the request contained some invalid stuff) and finally compute an MD5 hash. This again helps with case-insensitive file systems.
function request_to_file_name($fen, $size, $reversed)
{
    str_replace('/', '-', explode(' ', $fen)[0]);
    $name = join('_', [$fen, $size, $reversed]);
    $name = preg_replace("/[^kqrnbpKQRNBP_0-9\-]+/", "", $name);
    return md5($name) . ".png";
}
For the actual output, we set the mime type, convert the image from true color to palleted to make it smaller, check that the destination is writable, then write it to disk and read it back immediately. As fallback, it the writing/reading back fails, output it again as a PNG directly.
function output_image($img, $file_name)
{
    $file_path = CACHE_PATH.$file_name;

    header('Content-type: image/png');
    imagetruecolortopalette($img, false, 8);

    if (!is_writeable(CACHE_PATH) ||
        (imagepng($img, $file_path, 9) === false) ||
        (readfile($file_path) === false))
        imagepng($img, null, 9);
}
Finally we free the memory reserved for the images. PHP should clean up when the script ends anyway, but I think it’s good practice to clean after ourselves anyway:
function cleanup($img, $sprites)
{
    imagedestroy($img);
    foreach($sprites as $sprite)
    {
        imagedestroy($sprite);
    }
}
When a request is received, we first check if the file exists and output it directly if so:
function try_cached_file($file_path)
{
    if (is_readable($file_path))
    {
        header('Content-type: image/png');
        if (readfile($file_path) !== false)
            return true;
    }
    return false;
}
Putting it all together
You can get the complete code and pieces from GitHub. Have fun!