To aid those who want to be in control of their cameras, to go beyond point-and-shoot, I decided to write a series of tutorials on the basics of photography. If you don’t know what the exposure or aperture are, this little tutorial is for you, so read on. I’ve done my best to avoid overcomplicated technical details and give lots of analogies and examples instead.
What is exposure
The single most important thing to learn about when making a photo is exposure. You’ll never go beyond point-and-shoot without understanding how this works. Any gorgeous scene can and will be ruined by bad exposure — and you can turn a mundane setting into a startling photo by mastering the same exposure.

In this photo, lighting the model while keeping the details in the sky was tricky, because the setting sun was behind the model.
How do we capture the light in the scene in a photo? Whether we talk about film or digital, the principle is the same: we’re letting a piece of light-sensitive material to gather light from the scene.
How much light do we need to capture? Here’s the tricky part. Each scene has a certain amount of illumination that can be measured objectively using a light meter. The typical unit of measure for luminance is called “lux” but most light meters are set up to display results in photographic terms (more on that later). Most likely however, you won’t have a light meter, so you can’t rely on them. All photo cameras have internal light meters, except they can’t measure the actual light levels from the light source(s), but the light that enters the camera, which is the reflected light by the scene objects. Why is this important? It’s because the camera has to “guess”. The camera tries to find a good average of the light intensities – here’s how it works:

The camera takes readings of light intensities across different areas of the image. The number of segment and pattern varies from model to model. The readings are averaged based on different algorithms (“evaluative”, “3D matrix”, “center-weight”, etc.) and the exposure is adjusted to obtain a medium gray.
This method works most of the time – but sometimes it misses. Do you have your camera nearby? Take a picture of a white sheet of paper. — just the white paper, without anything on it. Download the picture and look at it on the screen. I’m willing to bet it came out gray-ish. Take another shot of a black T-shirt. Have a look at it, it’ll be gray or dark gray. Why?

White or dark backgrounds can fool the camera meter. The camera tries to average everything to gray. If a scene has bright areas and dark areas, the camera can determine a proper average and from that, it can determine the exposure. But, if you’re shooting tricky scenes, it’ll fail (even a sunset or a portrait against a white wall can be considered tricky, so don’t think you won’t encounter such cases).
Hopefully, by now you understand what exposure is and why it’s important to get it right. Next, it’s how do we get it.
The right exposure – juggling with shutter, aperture and ISO values
Obtaining the correct exposure is like filling a bucket of water. Too little water and you don’t have enough to use it; too much water and it spills, making a mess.
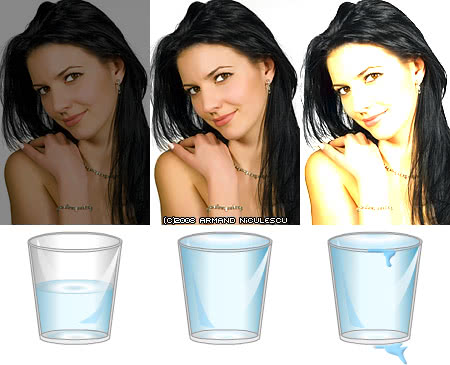
To fill the bucket with water you turn the tap. The longer you keep it open, the more water pours. You can also increase or decrease the rate of flow. So in effect you can get the same result either by keeping the tap open for longer and reducing the flow, or with a larger rate of flow for a shorter time. This is exactly how exposure works, except we use light instead of water.
The amount of time you let water, err, light “pour in” the camera is called “exposure time” or “shutter speed” and it can vary anywhere from 1/10000 of a second to minutes or hours. The amount of flow has its equivalent in “aperture size”, which basically measures how big the opening that lets the light shine on sensor or film is.
These two values – shutter speed and aperture are intertwined. To get the correct exposure, both have to be set correctly – that is, if you increase the exposure time then you need to decrease the aperture.
You may ask yourself now – why should we deal with two variables instead of one? Why not keep the aperture wide open and change just the shutter speed? It’s because unlike the bucket of water analogy, you’ll get different results depending on how you set these variables. Cellphone cameras or cameras set on Auto will try to work out a compromise, some sort of average between these two. Modes like “Portrait” or “Sport” are simple presets, favoring one or the other variable.
Shutter speed
The shutter looks like a curtain and acts like the tap in our example.When you press the shutter release button, it is opened briefly, allowing light to expose the film or sensor for the specified amount of time and then it’s closed again.
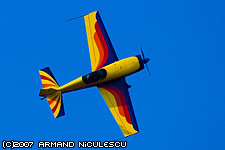
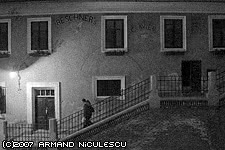
The shutter speed value is specified in seconds, for example “2s”, or “1/30s”. High shutter speeds (low exposure times) are needed to capture fast action. Capturing a bullet as it passes through a glass requires extremely short exposure times, like 1/10000s, which are usually obtainable only in controlled environments. Fast sports or dancing need exposures like 1/125s – 1/250s. At the other end, night scenes may require exposures of several seconds, even minutes, which lead to interesting effects.
Aperture
The aperture is iris-shaped, with metal blades that allow it to grow or shrink. The larger it is, the more light enters the camera. Just as the pupils get narrower in bright light and wider when it’s dark, a photographer will adjust the aperture size to gather the needed light.
The aperture size is measured using a rather unintuitive notation, such as f/2 or f/16. The larger the number, the smaller the aperture. An aperture of f/1.4 is very very wide, while f/32 is extremely narrow.
Changing the aperture has a very clear impact on the pictures, that is called Depth of Field. Depth of Field (or DOF for short) is an interesting topic on its own, that’s outside the purpose of this tutorial. Depending on the camera you have, altering the aperture may or may not be that apparent. Compact cameras have a lot more depth than (d)SLRs, which can be an advantage or disadvantage depending on situation.
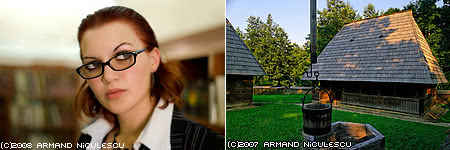
Above you can see pictures taken with different aperture values. Note how the image is blurred in front and behind of the subject when the aperture is wide open compared to the picture taken with a small aperture. A “shallow” DOF that has little detail in front and behind the subject is desirable especially for portraits, because a blurred background doesn’t distract from the main subject; on the other hand, landscapes benefit from a deep DOF that ensures that all close and distant features are sharp.
ISO Speed
Going back to our initial tap analogy, if you can alter the quantity of water that is collected in a bucket by altering the time you let the tap open or by increasing/reducing the flow, what happens if you change the density of the poured liquid? If you want a pound of liquid, then the denser it is, the quicker you’d get it because it’d require less volume – a liquid twice the density of water would occupy half the space, so all else being equal (time, flow) you’d get it twice as fast.
It’s the same with ISO speed. For film, ISO specifies the film sensitivity to light. A ISO200 film would be twice as sensitive than a ISO100 film, a ISO400 film is twice as sensitive than ISO200 and so on. The sensitivity ranges usually from ISO50 to ISO3200.
As with all things in life, by gaining sensitivity, you lose something else. More sensitive films (also called “fast” films) result in grainier pictures, with less vibrant colors (actually all ISO3200 films I know of are black-and-white only). With digital, things are relatively the same. The analog signal is amplified by software, resulting in more visible noise, especially in darker areas. The camera software tries to clean some of the noise with varying degrees of success. Noise levels are dependent on a number of factors, among which the sensor size and resolution are very important; digital SLRs with their bigger sensors behave much better than compact cameras.
Putting all together
To recap, a certain exposure can be achieved using a combination of three factors: ISO, shutter speed and aperture.
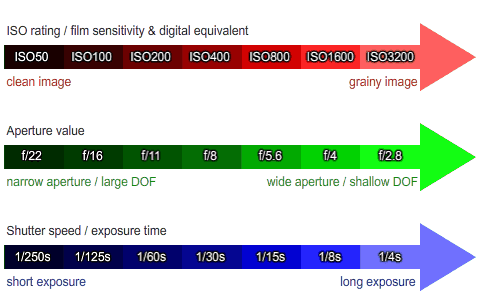
ISO goes from ISO50 (clean, bright image) to 100, 200, 400, 800, 1600 and 3200 (grainy, noisy) – doubling the sensitivity.
Shutter speed goes from let’s say 1s (slower), 1/2s, 1/4s, 1/8s, 1/15s, 1/30s (faster) and so on, doubling the speed.
Aperture has a stranger progression (than can be explained mathematically), from f/32 (narrow), f/22, f/16, f/11, f/8, f/5.6, f/4, f/2.8, f/2 (wide), each time doubling the amount of light that hits the film or sensor.
Each step in doubling or halving the exposure is called a “stop”, so the difference between 1/30s and 1/60s is one stop. The difference between f/5.6 and f/8? One stop. ISO3200 to ISO800? Gotcha – two stops. So, an exposure taken at ISO400, 1/125s, f/5.6 would be equivalent to one taken at ISO100, 1/30s, f/5.6 or ISO200, 1/15s, f/16. Modern cameras can adjust these values in half- or third- increments, so you will see values like 1/20s or f/9 or even ISO80.
Conclusion
Exposure and all the technical terms used here are really the foundation of photography. You may think you don’t need it – after all the cameras are pretty smart nowadays, right? I beg to differ. You should know your tools, first understand their capabilities, strengths and weaknesses and then use your creativity to push them to the limit.


One Response
Good fundamentals with easy understanding. Thanks
Comments are closed.