This article is outdated. There are more modern ways to achieve the same results in pure javascript.
If you thought having broadband makes page size irrelevant, you were wrong. Bandwidth costs money and a few saved kilobytes over a million impressions means real savings, not to mention that Google ranks sites based on their speed too.
With this in mind, it annoys me how much people put their faith in JQuery (and other similar frameworks) for simple stuff. Don’t get me wrong, I love JQuery as much as the next guy – when the complexity warrants it. Producing a full “Ajax” site (or html5 or whatever the buzzword of the day is) from scratch is a daunting task and having an easy way to do XMLHttpRequests is always welcome, as well as ways to easily manipulate the DOM. Still, in many cases, people are after simple effects, like sliding animations or fades and slideshows.
In a previous article, I’ve shown you how to do some nice collapsible panels that remember their state, complete with animations, without using any framework. Now I’ll show you how you can add a slideshow in your site in a few minutes, in under 2KB, rather than about 100KB for JQuery + JQuery Cycle plugin (which would be around 30KB even with gzip/deflate).
As a foreword (or is that forewarning?), you’ll need to know CSS and some javascript, especially if you want to customize the transitions. My aim is not to give you a prepackaged code but to teach you how to make something for yourself; I firmly believe in teaching you how to fish rather than giving you a fish, so to say.
The Markup
The HTML is very simple for our slideshow:
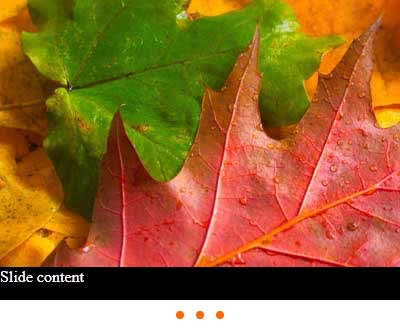
<div id="slideshow">
<div id="slides">
<div class="slide">Slide content</div>
<div class="slide">Slide content</div>
<div class="slide">Slide content</div>
</div>
<div id="slides-controls"><a href="#">1</a> <a href="#">2</a> <a href="#">3</a></div>
</div>
Can’t get any simpler than that. As you can see there are two areas – the actual slides and the controls, usually represented by small circles that show the current slide and allows the user to quckly jump to another one. Each slide can contain anything – images, text, forms, whatever.
It’s also SEO-friendly and the content is viewable if you turn off CSS/javascript.
The Styles
You’ll probably want to style the slideshow to fit nicely within your site.
There are five elements you have to style:
- the slideshow – that’s the whole widget that contains the slides and the controls.
- the slides container.
- the slides themselves.
- the controls container.
- the controls themselves.
For this example I chose some very simple styles:
#slideshow
{
	height:330px;
	width:400px;
	float:left;
}

#slides
{
	height:300px;
	position:relative;
}

.slide
{
	height: 300px;
	width: 400px;
	overflow: hidden;
	position:absolute;
	background: #000;
	color:#fff;
}

#slides-controls
{
	width:60px;
	background-color: #fff;
	height:20px;
	margin-left:auto;
	margin-right:auto;
	padding:5px;
}

#slides-controls a
{
	margin: 5px;
	width:8px;
	height:8px;
	border-radius: 4px;
	-moz-border-radius:4px;
	-webkit-border-radius: 4px;
	-o-border-radius:4px;
	background:#F60;
	border:1px solid #fff;
	text-indent:-9000px;
	display:block;
	overflow:hidden;
	float:left
}

#slides-controls a:hover { background:#F30 }

#slides-controls a.highlight
{
	background:#fff;
	border:1px solid #F30
}
Note how the div#sliderposition:relative while the slides have position:absolute, this is so we can easily “stack” them. Everything else should be straightforward.
As you can see, I used the border-radius property to create the dots. At the end of the article you can see more fancy styles.
The Javascript
Now that elements are in place, it’s time to do some magic.
Initialization
First of all we need to initialize the slideshow and add IDs and event handlers to our elements.
slidePrefix            = "slide-";
slideControlPrefix     = "slide-control-";
slideHighlightClass    = "highlight";
slidesContainerID      = "slides";
slidesControlsID       = "slides-controls";

function setUpSlideShow()
{
    // collect the slides and the controls
    slidesCollection = document.getElementById(slidesContainerID).children;
    slidesControllersCollection = document.getElementById(slidesControlsID).children;

    totalSlides = slidesCollection.length;

    if (totalSlides < 2) return;

    //go through all slides
    for (var i=0; i < slidesCollection.length; i++)
    {
        // give IDs to slides and controls
        slidesCollection[i].id = slidePrefix+(i+1);
        slidesControllersCollection[i].id = slideControlPrefix+(i+1);

        // attach onclick handlers to controls, highlight the first control
        slidesControllersCollection[i].onclick = function(){clickSlide(this);};

        //hide all slides except the first
        if (i > 0)
            slidesCollection[i].style.display = "none";
        else
            slidesControllersCollection[i].className = slideHighlightClass;
    }

    // initialize vars
    slideTransStep= 0;
    transTimeout  = 0;
    crtSlideIndex = 1;

    // show the next slide
    showSlide(2);
}
I defined some constants for the name of the IDs and classes, so you can change them if they are in conflict with something else in your page.
The initialization function collects the slides and controls, assigns them IDs and also adds handlers for the onclick events. Speaking of clicking, you can see that the slide controls call the clickSlide() function. We’ll have a look at it a bit later.
Changing the slide
The last bit in the initialization was calling the showSlide() function. Let’s see what it does.
slideDelay = 10000;
function showSlide(slideNo, immediate)
{
    // don't do any action while a transition is in progress
    if (slideTransStep != 0 || slideNo == crtSlideIndex)
        return;

    clearTimeout(transTimeout);

    // get references to the current slide and to the one to be shown next
    nextSlideIndex = slideNo;
    crtSlide = document.getElementById(slidePrefix + crtSlideIndex);
    nextSlide = document.getElementById(slidePrefix + nextSlideIndex);
    slideTransStep = 0;

    // start the transition now upon request or after a delay (default)
    if (immediate == true)
        transSlide();
    else
        transTimeout = setTimeout("transSlide()", slideDelay);
}
You can see that we’re using three variables: crtSlideIndex, nextSlideIndex and slideTransStep.
The logic behind all this is that we have a slide currently being shown and another one that’s supposed to be displayed next. If you look back at setUpSlideShow(), you’ll see that it defines crtSlideIndex = 1 and requests the second slide to be shown with showSlide(2).
So showSlide() checks to see if it’s not already in the middle of a transition (given by the slideTransStep variable). If all is fine, it references the current slide and the next one as crtSlide and nextSlide.
Next, it resets the transition step (slideTransStep = 0) and asks for the animation to start after a delay (slideDelay, given in miliseconds). Now, because we have the control buttons and want to be able to change a slide at any time, the immediate variable lets us bypass the delay and start the transition right away.
function clickSlide(control)
{
    showSlide(Number(control.id.substr(control.id.lastIndexOf("-")+1)),true);
}
This function takes the id of the clicked circle, e.g. “slide-control-2”, keeps the number after the last dash and calls showSlide() with the immediate parameter set to true so that the the transition occurs at once.
Animating the transition
If you read my previous article on collapsible panels, you should know by now what happens next. It’s the core of our little widget and it’s so simple I wonder why people don’t use it more often.
Simply put, with Javascript you can alter any property you can define with CSS. Margins, top/left positioning, clipping, you name it. For this tutorial I decided for a simple cross-fade transition between the current slide and the next one, but you can animate the left property to slide things in an out, or mabye the clip property to create wipes.
Also, in this example the animation is linear but guess what, easing in and out is easy to do too.
slideAnimationInterval = 20;
slideTransitionSteps   = 10;

function transSlide()
{
    // make sure the next slide is visible (albit transparent)
    nextSlide.style.display = "block";

    // calculate opacity
    var opacity = slideTransStep / slideTransitionSteps;

    // fade out the current slide
    crtSlide.style.opacity = "" + (1 - opacity);
    crtSlide.style.filter = "alpha(opacity=" + (100 - opacity*100) + ")";

    // fade in the next slide
    nextSlide.style.opacity = "" + opacity;
    nextSlide.style.filter = "alpha(opacity=" + (opacity*100) + ")";

    // if not completed, do this step again after a short delay
    if (++slideTransStep <= slideTransitionSteps)
        transTimeout = setTimeout("transSlide()", slideAnimationInterval);
    else
    {
        // complete
        crtSlide.style.display = "none";
        transComplete();
    }
}
We start by showing the nextSlide and setting its alpha property, along with the same property for crtSlide. See how we’re doing this for IE as well using its non-standard filter. Compliant browsers treat alpha as a value between 0 and 1, while IE treats it as between 0 and 100. SlideAnimationInterval controls the delay between two steps of the transition while slideTransitionSteps is the total numbr of steps used in the transition.
You can do easing effects if you alter the opacity calculation or you can replace the opacity property entirely.
When the transition has reached its final step, the current slide (now completely transparent) is hidden and the transComplete() function is called. Lets see it:
function transComplete()
{
    slideTransStep = 0;
    crtSlideIndex = nextSlideIndex;

    // for IE filters, removing filters reenables cleartype
    if (nextSlide.style.removeAttribute)
        nextSlide.style.removeAttribute("filter");

    // show next slide
    showSlide((crtSlideIndex >= totalSlides) ? 1 : crtSlideIndex + 1);

    //unhighlight all controls
    for (var i=0; i < slidesControllersCollection.length; i++)
        slidesControllersCollection[i].className = "";

    // highlight the control for the next slide
    document.getElementById("slide-control-" + crtSlideIndex).className = slideHighlightClass;
}
This function resets the transition steps and advances the current slide index. It also removes the IE filter, so that ClearType is re-enabled. Finally, the current slide control is highlighted.
Where to go from here
As an exercise for the reader, you can add a pause function when you rollover the slideshow (just make sure you put the mouse event handlers on the slideshow element, not on the individual slides). You can also replace the fade effect with sliding or wipes.
Have fun!


15 Responses
Great tutorial!! I was looking for something like that for a while. I also prefer websites without frameworks, so please add more stuff like this, thanks Armand
regards,
robert
It’s a Fantastic code , I think it can do using jQuery’s jflow only. nice Work
Congratulation
Anes P.A
I love that you’ve achieved this without a framework – very impressive. You should note that the full script doesn’t auto-scroll for some reason, which I have tried to debug without success yet. You’re minified version works as expected though.
Hi Armand. I’m sure you are aware of this, but there is a bug when selecting the active slide button. When this is selected the current image flickers then disappears, and the slideshow only becomes visible when the next image is timed in. What would your solution to this be, bearing in mind I haven’t got the same coding ability as you. I presume making the current button inactive would be a work around? Thanks.
I wasn’t aware of the bug until recently. I will work on a fix.
The archive is fixed now. You can download new versions.
Thank you for great tutorial.
I want to use you work in my free module, but I can’t find here nothing about licensing this code.
I did not include a license in the code, but unless otherwise noted, I release everything under the MIT License:
So here’s the license for this code:
Copyright (C)2010 by Armand Niculescu
Permission is hereby granted, free of charge, to any person obtaining a copy
of this software and associated documentation files (the “Software”), to deal
in the Software without restriction, including without limitation the rights
to use, copy, modify, merge, publish, distribute, sublicense, and/or sell
copies of the Software, and to permit persons to whom the Software is
furnished to do so, subject to the following conditions:
The above copyright notice and this permission notice shall be included in
all copies or substantial portions of the Software.
THE SOFTWARE IS PROVIDED “AS IS”, WITHOUT WARRANTY OF ANY KIND, EXPRESS OR
IMPLIED, INCLUDING BUT NOT LIMITED TO THE WARRANTIES OF MERCHANTABILITY,
FITNESS FOR A PARTICULAR PURPOSE AND NONINFRINGEMENT. IN NO EVENT SHALL THE
AUTHORS OR COPYRIGHT HOLDERS BE LIABLE FOR ANY CLAIM, DAMAGES OR OTHER
LIABILITY, WHETHER IN AN ACTION OF CONTRACT, TORT OR OTHERWISE, ARISING FROM,
OUT OF OR IN CONNECTION WITH THE SOFTWARE OR THE USE OR OTHER DEALINGS IN
THE SOFTWARE.
Great code, but where should I include this license, if I want to use it? If I include it in the html file as a comment, is it okay?
Yes, it’s fine.
Elegant code. Unfortunately the download link says “File does not exist.”
Sorry, it’s fixed now.
Thanks very much!
There is only a very small area to klick on the control dots?
The “dots” are built with css so you can make them any way you like.
Comments are closed.