While most casual photographers still shoot in JPEG, there’s no denying that RAW gives the photographer unparalleled control, allowing one to actually make the picture, not just take it. And what’s really exciting is that with each new generation of software, the processing becomes even more powerful, allowing one to revisit old photos and get even more “punch” out of them.
Note: I first published this article on another site of mine, the now-defunct twin-pixels.com, that’s why you’ll see the watermark on the pictures.
I started this series of articles 6 years ago and their success has encouraged me to keep going.
This is not a usual 5-minute review. I’ve been using each app for a very long time and I spend weeks with the new versions before writing the conclusions. I’m also doing my best to be unbiased.
2013 Lineup
Over the years I tried to add and compare more products. I also get requests to include program A or B as well. One problem is that not all programs are even in the same ballpark. Reviewing for example ACDSee with Lightroom would be pointless because ACDSee is intended for a different class of users.
Compared to my last review in 2010, I decided to remove two programs. The RAW converters I’ll be reviewing are:
- Adobe Lightroom 4
- Capture One Pro 7
- DXO Optics Pro 8
I decided to drop Aperture because Apple hasn’t upgraded it in over 2 years. They add supported cameras from time to time but not much else. Compare this with Lightroom constant updates that bring new features even in point-releases. I dropped Bibble Pro for the same reason. Corel bought Bibble and renamed it Aftershot Pro. Unfortunately Corel has a terrible record with innovation (and I say that as a former Corel fan of the ’90s). Aftershot is not different from Bibble 5 that I reviewed 2 years ago. If they do come up with a real upgrade, I may reconsider its inclusion.
Interface
All three programs have remarkably similar interfaces. Dark, mostly monochrome interfaces allow the user to discern easily between subtle shades of colors and dark tones. Image in center, collapsible panels on the sides, a filmstrip on the bottom – Lightroom, Capture One Pro and DXO use the same blueprint.
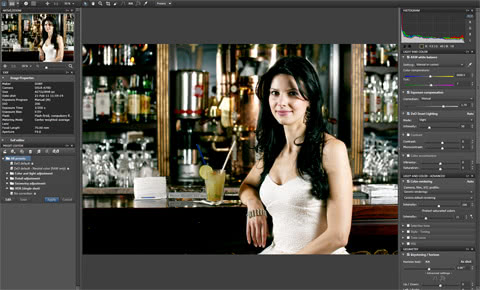
Capture One Pro 7
Capture One aims to be uncluttered. It has a toolbar at the top and panels only on the left side, organized logically in tabs. I love its clarity and level of polish. I find some actions require more work than in Lightroom, but overall it’s a simple and intuitive interface. Some simple operations are still needlessly complicated – like crop and rotate, which are two separate actions here, are done in one simple step in Lightroom. Copying develop settings from one photo to another is also not as natural as in Lightroom.
DXO 8
DXO interface has improved dramatically in the last few years. It still doesn’t feel as something created by photographers for photographer but it’s no longer tedious. Personally I don’t like that if I choose the Color Picker or some other tool the image splits automatically into Before/After. Some other things (like Keystoning) are vastly superior to Lightroom. Whereas in Lightroom you have to juggle 3 separate sliders to rotate a photo along the X, Y and Z axis, in DXO and Capture One you just draw a deformed rectangle on screen along the lines that should be parallel.
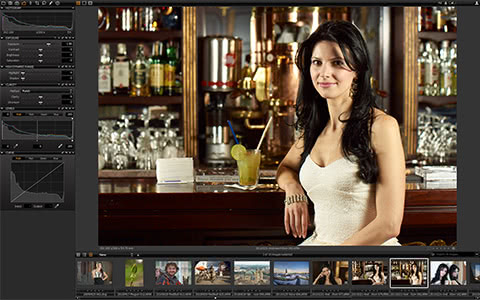
Lightroom 4

Lightroom has a simple and intuitive interface with parts that can be easily shown or hidden easily. You can easily customize the interface to fit your own workflow, turn panels off, even customize the “nameplate” to your company name – a nice touch for when you’re working with a client.
Unlike DXO and Capture One, Lightroom aims to be a full DAM (Digital Asset Manager), however having to jump between the “Library” and “Develop” mode still irritates me after all this time – Aperture could work seamlessly. Lightroom 4 adds a “Map” mode for geotagged photos and in addition to the Web/Print/Slideshow tags it has a rather interesting “Book” tab that lets you create photobooks (and even send them to Blurb for print).
Lightroom also includes the best dual screen support. All three programs are able to take advantage of more than one monitor, but Lightroom makes this easy and more flexible – you select exactly what you want to see on the second screen. In Capture One and DXO you can “undock” panels on the secondary screen (usually the thumbnails) but it’s not the same thing. In Lightroom I can have the main monitor in Develop, a secondary on Survey mode and the third in Library.
Features
All programs are remarkably similar in their core capabilities, so rather than providing a very long list of features, I’ll concentrate on the differences.
Lightroom 4 is the only program that’s also a real DAM (Aperture is too). It handles tagging, geotagging and a lot of smart filtering and reviewing. In this regard, DXO 8 and Capture One 7 are focused only on conversion. (Recognizing this issue, Phase One offers a companion to Capture One Pro, named Media Pro, but that’s beside the object of this review.) So Lightroom has an advantage for full-time photographers. If one is doing photography – and only photography – all day long, Lightroom will be a big help. For anyone else, there are so many DAMs out there, from the free XNView to Adobe Bridge, that it doesn’t really matter. Personally, as a designer, I don’t work just with photos but will all kind of assets, so a program like Bridge, where I can see Illustrator or inDesign files too is more useful to me.
Lightroom also has many output options, from slideshows and web albums to print (including proofing) and photobook-making. You can even publish directly to Facebook for example. DXO and Capture One are, again, focused on just getting the photo out. I don’t think I ever used Lightroom’s Web Albums feature and I prefer to have complete control over a photobook in InDesign, but for many users it’ll be worth creating a photobook directly in Lightroom instead of buying and learning another program.
All three programs have lens corrections built-in, but is DXO remains the master in optical corrections – after all, they specialize in lens benchmarking. If you have a supported camera+lens combo, the precise corrections are great, and even if the lens is not recognized, you can still apply most of the corrections – sharpness falloff, light falloff, distortion corrections, even fish-eye corrections. Lightroom comes in second. It comes with a pretty extensive lens database (you can use a lens profile even if it doesn’t match the camera body) and you can create or download additional profiles from Adobe. The lens profiles however don’t have support for correcting sharpness falloff. Capture One also has a lens database but it’s much more limited (20 Canon lenses as opposed to over 100 in Lightroom).
Capture One 7 and Lightroom 4 also support localized corrections using brushes and gradients to mask areas. This is an incredibly powerful tool that in many cases can eliminate the need for Photoshop. And since the corrections are applied on the RAW image non-destructively, you can always go back and fine-tune the eye color or skin blemishes. In Lightroom this non-destructive process goes further as it maintains a full history of edits for each file, including snapshots.
One unique feature I love in Capture One is the focus overlay, which clearly marks the areas of a photo considered in focus. It’s such an useful tool during the selection phase, when you need to weed out any poorly-focused images.
Image Quality
As is was the case with my previous reviews, I tried to find some challenging pics. Photographers reviewing RAW software often use their best photos. I prefer to use images that are flawed so that each program’s strengths and weaknesses are discovered. To complicate matters even more, my workflow is DNG-based and DXO does not support DNG, so I had to find some native RAW files. The images come from 3 different DSLR cameras and 5 or 6 lenses.
Portraits – Skin tones
For the first test I found a nice but unfortunately severely underexposed photo. It was made with 2 flashes and umbrellas, so the color balance was good. I kept all programs on default settings, just cranking up exposure compensation to 1.5
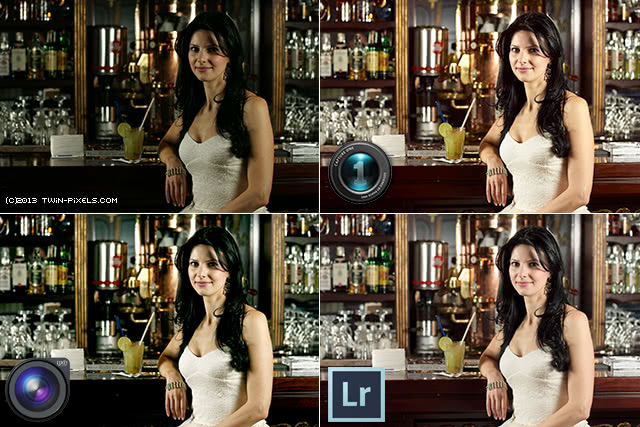
Capture One and Lightroom produced very similar results. I would give the edge to Capture One, which created a nicer skin tones (Lightroom is too pink). DXO kinda messed this, with shadows too deep (no detail in lower left) and a green cast in shadows (look in the model’s hair and in the mirror behind the counter).
The next portrait is a candid snapshot in available light.
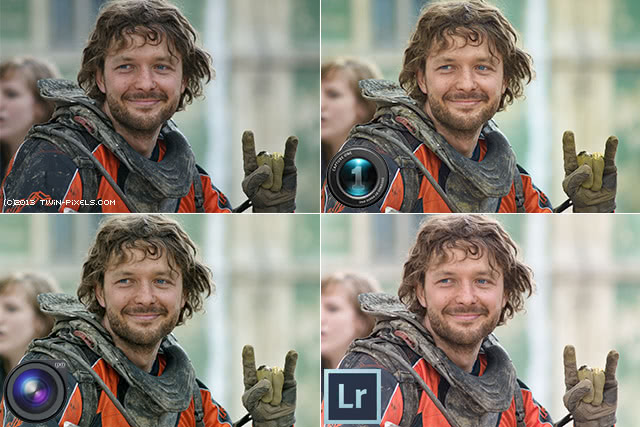
Three programs, three looks with subtle differences. DXO produces again a more contrasty look, more similar to the in-camera JPEG. Interestingly, I had to add a 0.5 exposure to Capture One as it underexposed the photo by default. Lightroom opens the shadows more, washing out the background. It also renders a more reddish skin. Overall is difficult to declare a winner, although probably C1’s skin is the best. It’s interesting that the colors are also different than in the previous review in 2010, a sign that the color profiles have been tweaked since then.
Colors
Here we go one step further, allowing adjustments of white balance, exposure and vibrance/saturation to achieve the best look.
The airplane photo was nice but the colors were dull due to atmospheric haze. Let’s see how our programs fare.
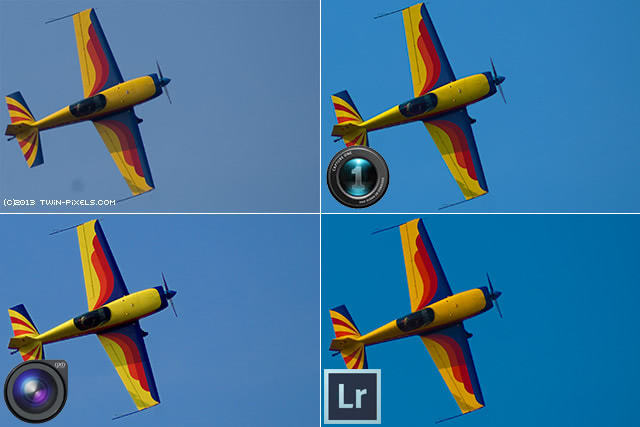
There’s no dispute that Lightroom got the best colors. It’s also the closest to the real thing. Note that all three programs managed to remove that ugly dirt spot in the lower left part of the image (visible only in the original unretouched photo).
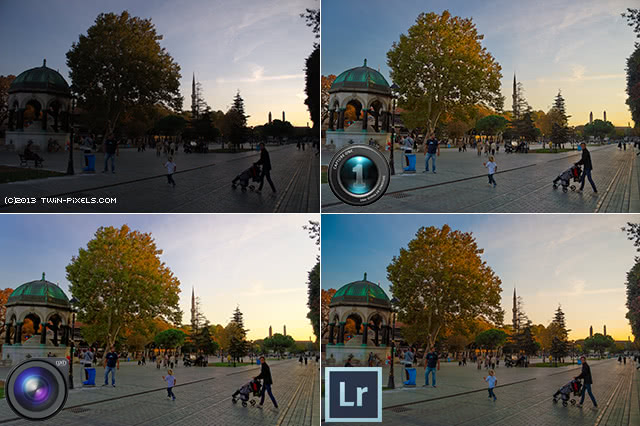
Now let’s try a night scene from Istanbul:
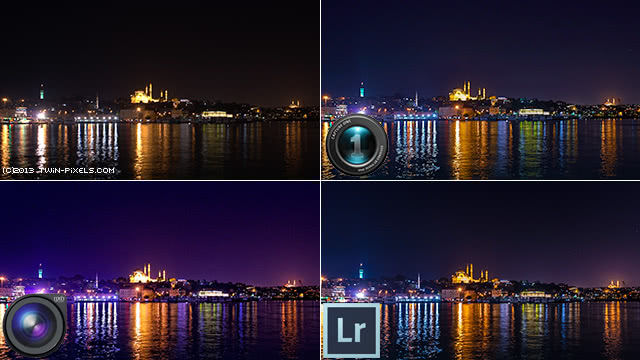
With Lightroom I was able to avoid blown highlights in Hagia Sophia in the center (it’s small, you’ll have to trust me on this). Capture One is not far behind. I was rather disappointed with DXO; it produced some very ugly artifacts in the sky (not visible here) and I just wasn’t able to control the shadows & highlights properly with its Smart Lighting. DXO 8 uses a simplified Smart Lighting. I tried the old one too without much success.
Landscape
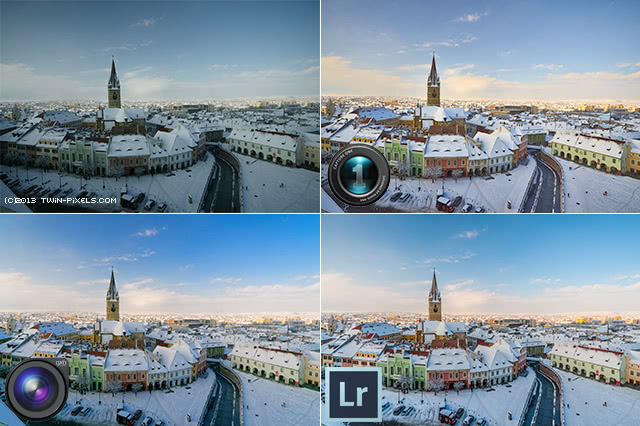
I exposed the picture for the sky, so the colors came out rather dull. I adjusted WB the same in all programs (picking the same white area), I increased the saturation and vibrance to taste and opened up the shadows.
DXO always produced amazing sky colors and this is no exception. Look how the clouds remain neutral, compared to the yellow cast in Capture One Pro 7. The details are very difficult (if not impossible to pick up in these very small samples) but Capture One produced a very ugly color on the tower. I was again unable to open the shadows produced by DXO to my liking. Overall however I’d say DXO produced very nice and correct colors.
Architecture
When shooting with a very wide angle lens, the perspective becomes distorted. Let’s see how, in addition to producing beautiful colors, the programs can correct the perspective issues:
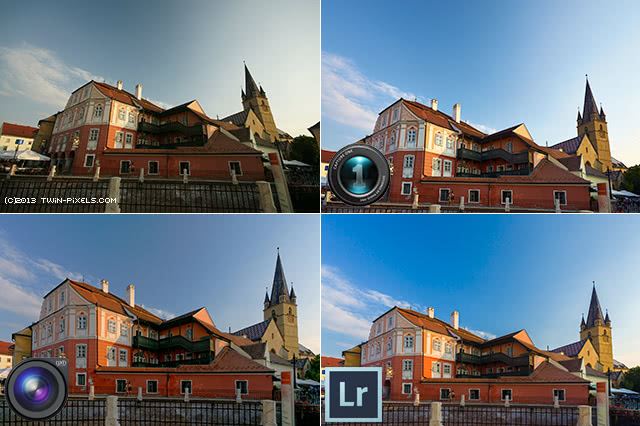
Wow, each program processed the scene differently. First, in terms of perspective correction, DXO is the clear winner. Look how squashed the tower looks in Lightroom. Capture One couldn’t even apply that much distortion on the image and cropped a lot of the bottom. I should add that Lightroom’s lack of a visual tool for keystoning makes perspective correction unnecessary difficult and strange to understand, considering that the perspective crop tool in Photoshop is excellent. In terms of colors, DXO missed the mark a bit. I have no idea why the sky wasn’t better, especially if you look at the previous image, which was taken with the same camera, lens and polarizing filter.
HDR
OK, I’m not talking about in-your-face HDR, but rather controlling highlights and shadows in high-contrast scenes. My wife made the next photo, using an old DSLR. The camera was in A mode and most likely it tried to avoid blowing up the sky, severely underexposing everything.
This is what I meant when I wrote that it takes a flawed photo to really put each engine to the test. I spent considerable time tweaking this photo in each program. First of all, it’s amazing how much light and color info they could extract, especially from a 7-year-old DSLR. Capture One is best able to keep greys neutral in the pavement and child’s shirt; DXO brings out some very nice greens in the foliage. Lightroom makes a nice sky.
Detail Extraction
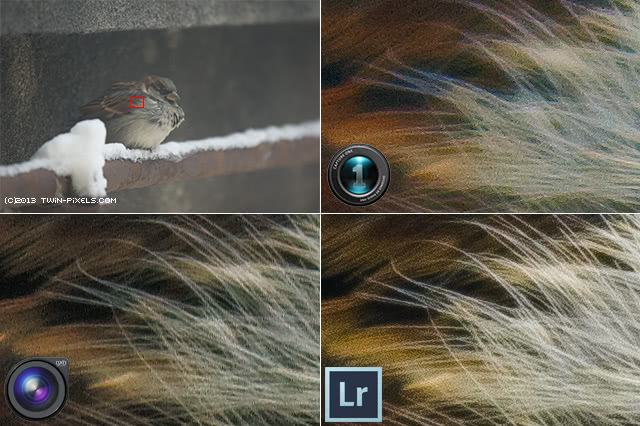
I shot (well, photographed) this sparrow at F/2.8 through a very dirty window. The image suffers from low contrast, lens softness and given the shallow DOF the area I select is not in perfect focus. Let’s see how our reviewed programs managed.
Even in an area not in the thin plane of focus, there’s lots of detail (it’s a 24 Mp image). Capture One fared rather poorly. In a different image (not included in this review as it wasn’t so demanding) it was much better, but here we have lots of artifacts and not much fine detail. Lightroom 4 makes the best out of the picture.
Optical corrections
I had an old telephoto lens that was great but in some contexts it had severe purple fringing issues. Major issues. So I have a portrait just with lots of purple fringing that I keep using just for this.
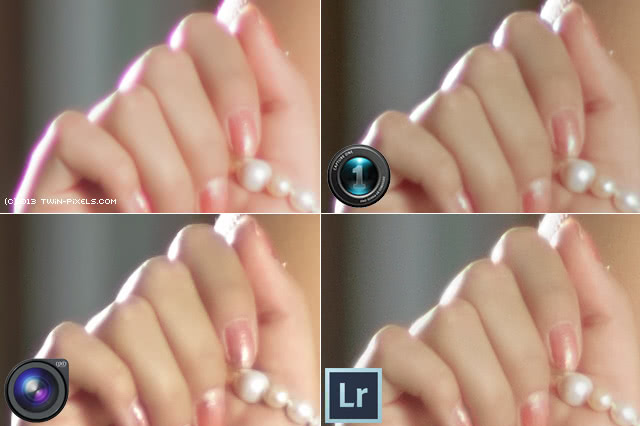
Purple fringing used to be one of Lightroom’s weak points but now it has a sophisticated tool with extensive manual control. The image shows purple fringing in other parts of the image too, not visible here. Lightroom was unable to eliminate all issues without affecting other areas (it started removing red from the model’s bright red lips). It’s true that you can protect areas with a brush, but DXO could process the entire image perfectly without the need to tweak anything. Look how DXO not only removed the actual purple color, but also removed the halos around fingers completely. Impressive!
All three programs are able to remove lateral chromatic aberrations and vigneting effectively. Capture One Pro 7 and DXO 8 can also correct sharpness falloff.
Noise reduction
Since I don’t usually shoot at high ISO and because I wanted a stress test, I decided to make a test shot, by combining a chrome material with a dark smooth one and a black textured fabric. Because of the different surfaces, each program must be able to balance smoothness with detail. Of course you can crank up the luminance smoothing eliminate all noise and have a smooth surface, but in doing so you destroy the detail in fabric. Increase the detail too much and you get false detail in the smooth areas.
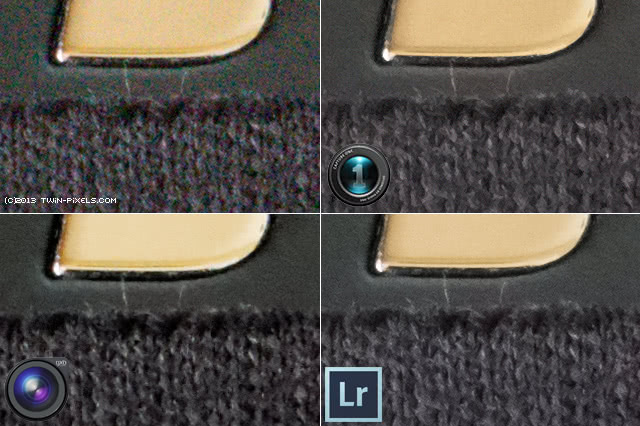
Pretty amazing. A few years ago, the differences in noise reduction were very large but now all three programs seem equally capable of cleaning the image. I should add that DXO selected the noise settings automatically and I left it there on default.
Speed
I used a Dell XPS 502 laptop with 8Gb of RAM and a 4+4-core i7 2.2 GHz Intel CPU hooked to two HP ZR24w 1920×1200 monitors. I think it’s a pretty good setup. All programs use about the same amount of RAM, Lightroom seems the least hungry app actually. Capture One felt the most responsive; by responsiveness I mean how quickly any change in a setting is reflected on the displayed image. Responsiveness is very important because ideally the feedback for any change should be instant. DXO was the slowest.
Pricing
Compared to previous years, the prices have dropped significantly:
- Capture One Pro 7: $299
- Adobe Lightroom 4: $145
- DXO
- Standard: $99
- Elite (full frame support): $199
Conclusions
With each generation of RAW processors, it becomes harder and harder to judge which program has the best features and produces the best results. 5 years ago, DXO was the only program with keystoning support and its HDR capabilities were second to none. Today Lightroom can do this, and arguably better. Capture One used to be really bad at high ISO but look at it now.
If you’re serious about photography and want to get the best out of your camera, it’s worth investing in a program. But which one?
I’ll start by saying that if you already have one of these 3 programs, keep it and upgrade to the latest version. The programs are so close in terms of performance and features that it’s not worth switching.
For low-volume work consisting mainly of landscapes and architecture, I recommend DXO. At $99 it’s a steal and it renders very nice greens and blues and its optical corrections are the best. For professional studio portrait photographers, Capture One Pro has the best tethered capture workflow, a focus mask feature to get instant feedback on focus and the best skin rendition (it even has a skin color balance and other skin-related color adjustments). For everything and everybody else there’s Lightroom, a well-thought, well-balanced program that can do pretty much everything.


9 Responses
So for most things I use LR4 (CS5.5 if I need more layering job). For my best portrait I have to go into View or Capture NX and export the 90mb tiff file then add it to lightroom since LR4 features are the best (faster then going into photoshop too). I still hoping Nikon release capture NX 3 with improvement so I don’t have to use LR, but since google bought Nik I doubt it will be anything great. Either Nikon share its nef code or have an option to save in dng like pentax, and a few others, so I can just use LR4 straight up.
I’d love if more manufacturers would mature and start using DNG, so we can finally have a standard.
RAWs are pretty similar anyway. All RAWs and the DNG format are based on TIFF, a very versatile format that allows you to save almost anything in an image.
20-30 years ago there were lots of image formats. Each graphics program had its own format with advantages and drawbacks: PICT, PCX, GIF, Targa, BMP, DIB and more. Nowadays they are gone in favor of standards like JPEG and TIFF.
The Use of DNG would be a big step forward, but I don’t know if DNG can hold all the information of CR2 (like temperatur of camera, Focuspoints etc.). And to the other formats, GIF is still here because of animations and some newer ones like png are additive, because of copyrights or alphablending.
The review of the the RAW Converter was really interesting. Maybe a comparision with the free RAWTherapy would be interesting. I find the lenscorrections, especially the LCA and CA Alghrotihms at least as good as Dxo.
Yes, DNG is designed to hold camera-specific info, not just focus points, but even non-Bayer image sensor layouts.
So for most things I use LR4 (CS5.5 if I need more layering job). For my best portrait I have to go into View or Capture NX and export the 90mb tiff file then add it to lightroom since LR4 features are the best (faster then going into photoshop too). I still hoping Nikon release capture NX 3 with improvement so I don’t have to use LR, but since google bought Nik I doubt it will be anything great. Either Nikon share its nef code or have an option to save in dng like pentax, and a few others, so I can just use LR4 straight up.
I have read and enjoyed all of your articles on RAW processing software over the years, but I completely disagree with your comment about ACDSee at the top of this review.
Let’s not confuse ACDSee with ACDSee Pro – In my opinion, ACDSee Pro is every bit in the same league as the applications you have reviewed. Historically, it is priced in the same range as the other products which themselves vary quite a bit from cheapest to most expensive. Then if we look at each of your main sections, we see again that it compares very well.
INTERFACE: yep, remarkably similar to the other three.
FEATURES: Ditto except that it also has real DAM functionality, including geotaging, smart filtering and reviewing, which puts it right up there with Lightroom only, in my opinion, with a more intuitive implementation of those features. Oh yes, and version 6 includes a localized corrections option using a brush, once again trumping DxO.
IMAGE QUALITY: I have compared ACDSee Pro to Lightroom 4, DxO 7, CaptureOne 6 and the latest version of Bibble. Frankly each has its strengths but when push came to shove, I found ACDSee Pro generally performed at least as well and sometimes better, than the other three, and while I felt that Lightroom offered the best overall image processing results, it was nowhere near as convenient in use so I kept ACDsee. I haven’t tried DxO 8 or CaptureOne Pro 7 so I can’t speak to those.
The same goes for pretty much all the other categories including speed, colour, noise reduction, optical corrections and detail enhancement.
I realize that ACDSee Pro for PC doesn’t seem to attract the same attention from reviewers but I think it is an oversight based on perception rather than the actual capabilities of the application.
Nevertheless, I continue to enjoy your reviews and the information you have collated on the other apps.
Christopher, after reading your eloquent comment, I feel compelled to try ACD See Pro myself once more 🙂
Great review, with the writing locked down to the real differences, and Pictures to compare!
Regarding CaptureOne, following the vendors website, a asset-management has been added compared to the previous version (but it seem not at the Level of Lightroom).
Regarding Lightroom, as a side note. Adobe has changed it’s concept to Cloud-only/monthly subscription for many Products (but not yet for Lightroom). Unfortunally Adobe has announced that the “Cloud” will also offer Lightroom in future with additional features (in comparison to the packaged version, which will also be sold in “future”). So for me, who is looking for a long-term Solution, I’m currently not keen to switch to Lightroom, but from this (and other review’s) I will put CaptureOne much more in focus as possible choise.
I’m a “prosumer” photographer (read: my photos are not good enough to sell but I can’t keep myself from creating my own art), having spent countless hours in nature, but also did some basic portrait work.
Given the size of my photo library (250K mostly RAW exposures, many of them due to multi-exposure bracketing), I determined Lightroom to be the only one of these tools to be even capable of organizing my base of photos properly (ue to its DAM features), and made some valuable additions (eg. the folder publisher plugin from Jeffrey Friedl for automatic low HD quality exports to NAS/home network). The optical quality of edited shots in Lightroom 3.6/5 can be pretty amazing, though when I make some key large poster prints, DxO 8 is almost always my choice. The fine detail (noise/sharpening), color rendition capabilities, and optical corrections make it the better choice for me for most of the high-profile shots. Using the two in tandem (Lightroom for all shots, and exporting to DxO for maybe 100 of my photos for large prints so far), seems to strike the balance I need. On the other hand, DxO-standalone would be totally lost with the amount of data given.
I also found it necessary to beef up the hardware, in order to process fast amounts of Lightroom shots and some intense DxO processing in time: 4-disk RAID 0 array (with allway sync backup solution) for fast access to large amounts of data (up to 700 MB/s), i7 2700K quad core water cooled 4.8GHz for CPU power in LR and DxO, and an extra GPU using OpenCL to speed DxO processing further (raw-convert 1 shot/4s instead of 1 shot/7s in CPU-only mode). The combination does all I wanted, but it was a long way to get there.
Comments are closed.