Finding tools or remembering where is a button you need fast can be disturbing sometimes so I have selected 50 useful keyboard shortcuts to help you work faster.
You can also customize your shortcuts using the Keyboard Shortcuts command by using Edit > Keyboard Shortcuts but I’m going to give you the default keyboard shortcuts and talk about customizing them in another post. To activate a tool through a shortcut just hold down the a key or a set of keys for a short period of time. I’m going to group the shortcuts in categories.
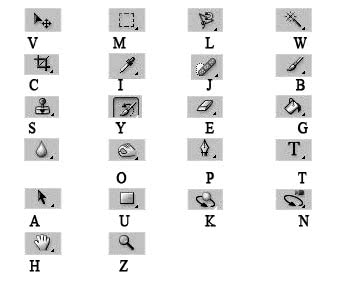
I find most important to know the keys for tools because that’s what you use more frequently so here they are, I also added an image to help you see which button is which:

- V – Move tool
- M – Rectangular Marquee tool,Elliptical Marquee tool
- L – Lasso tool,Polygonal Lasso tool, Magnetic Lasso tool
- W – Magic Wand tool,Quick Selection tool
- C – Crop tool, Slice tool, Slice Select tool
- I – Eyedropper tool, Color Sampler tool, Ruler tool, Note tool, Count tool
- J – Spot Healing Brush tool, Healing Brush tool, Patch tool, Red Eye tool
- B – Brush tool, Pencil tool, Color Replacement tool
- S – Clone Stamp tool,Pattern Stamp tool
- Y – History Brush tool,Art History Brush tool
- E -Eraser tool, Background Eraser tool,Magic Eraser tool
- G – Gradient tool,Paint Bucket tool
- O – Dodge tool, Burn tool, Sponge tool
- P – Pen tool, Freeform Pen tool
- T – Horizontal Type tool, Vertical Type tool, Horizontal Type mask tool,Vertical Type mask tool
- A – Path Selection tool, Direct Selection tool
- U – Rectangle tool,Rounded Rectangle tool,Ellipse tool,Polygon tool,Line tool,Custom Shape tool
- K – 3D Rotate tool,3D Roll tool,3D Pan tool,3D Slide tool,3D Scale tool
- N – 3D Orbit tool ,3D Roll View tool,3D Pan View tool, 3D Walk View tool, 3D Zoom tool
- H – Hand tool
- R – Rotate View tool
- Z – Zoom tool
Brushes panel keys are important too some of the tools are brushes based.
- Delete brush – Alt-click brush
- Rename brush – Double-click brush
- Change brush size – Alt + right click + drag
- Decrease/increase brush softness/hardness – Alt + Shift + right click + drag
- Select previous/next brush size – , (comma) or . (period)
- Select first/last brush – Shift + , (comma) or . (period)
- Display precise cross hair for brushes – Caps Lock or Shift + Caps Lock
- Toggle airbrush option – Shift + Alt + P
Transforming selections, select borders and paths are also important and here are your keyboard shortcuts:
- Transform from center or reflect – Alt
- Constrain – Shift
- Distort – Control
- Apply – Enter
- Cancel – Control + . (period) or Esc
- Free transform with duplicate data – Control + Alt + T
- Transform again with duplicate data – Control + Shift + Alt + T
The Layer panel also has shortcuts that you may use, here are some:
- Group layers – Control + G
- Ungroup layers – Control + Shift + G
- Create/release clipping mask – Control + Alt + G
- Select all layers – Control + Alt + A
- Merge visible layers – Control + Shift + E
- Edit layer style – Double-click layer
- Show/hide this layer/layer group only or all layers/layer groups – Right-click the eye icon
- Disable/enable vector mask – Shift-click vector mask thumbnail
- Toggle lock transparency for target layer, or last applied lock – / (forward slash)
- Edit layer effect/style, options – Double-click layer effect/style
- Move layer to bottom or top – Control + Shift + [ or ]
- Copy current layer to layer below – Alt + Merge Down command from the Panel pop‑up menu
- Merge all visible layers to a new layer above the currently selected layer – Alt + Merge Visible command from the Panel pop‑up menu


9 Responses
Thank you Stefania,
I didn’t know PS has soooo many shortcuts.
I guess I’ll print your post and keep it for reference.
welcome, actually there are a lot more but I have just selected the ones I found most useful, anyway in the future posts if I ever try to explain something if it has shortcuts I will mention it.
Excellent post. Thanks for sharing!!!
That’s very useful, thanks!
Great guide. For the tools that display a little black triangle in the bottom right corner (indicating there are more than one variations of the tool) remember to press “SHIFT” + “” to cycle through the options.
For example, pressing “M” will select the marquee tool… pressing “SHIFT+M” selects the NEXT marquee variation (circular selection), and so on…
EDIT: … remember to press “SHIFT” + “LETTER” to cycle through the options.
(The blog software automatically edited my original comment, and made the instructions vague.)
Really helpful. Very kind sharing this stuff.
Thanks a lot!
THANK YOU FOR THIS TIP!!! I assumed that when they changed the shortcuts and you couldn’t cycle through them by clicking the letter multiple times, that they just didn’t work that way anymore. That’s bugged me since then, and never thought to search to see if it had been modified, instead of eliminated. Ha! Wow, I bet this has worked since Photoshop 6, when I thought it was gone!!! I’m going to be in shock for a few hours now. Thanks again! 🙂
thanks u so much giving me shortcuts of ps
Comments are closed.